
计算机与人工智能
Python 复刻苏轼笔意:手写级书法生成器 (完整源码)
文章目录
在数字化时代,标准的电脑排版虽然整洁,却丢失了传统书法的“精气神”。
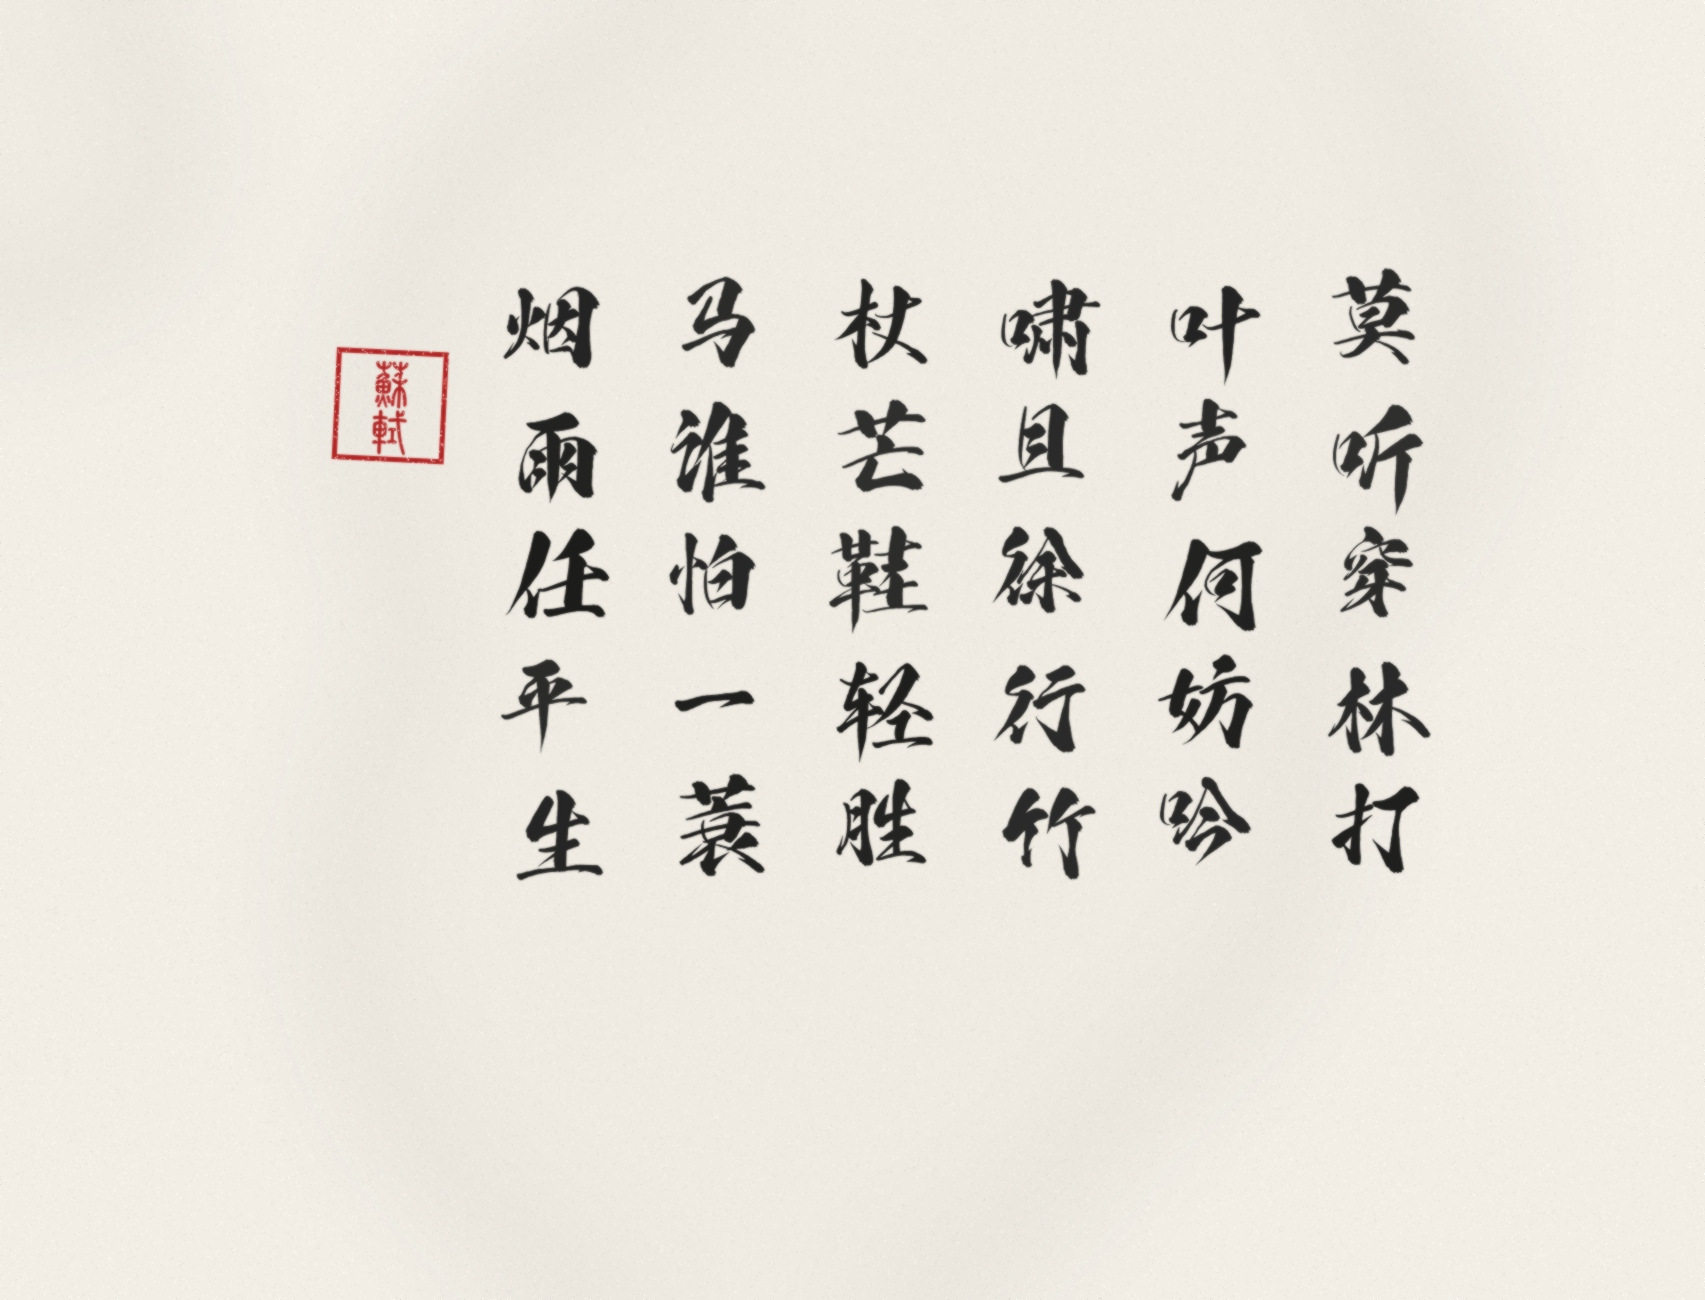
真正的书法作品,字与字之间有呼吸感,笔墨有浓淡枯湿,印章有金石古朴。本文将分享一个完整的 Python 脚本,通过双字体引擎和随机抖动算法,将一段普通的文字转化为一幅足以乱真的电子书法艺术品。
01. 核心原理:如何用代码模拟“手写”?
要打破计算机绘图的机械感,我们需要在三个维度上引入“混乱”:
-
布局重构(竖排): 摒弃现代的横排逻辑,采用古法从右向左、从上向下的书写顺序。
-
双字体引擎:
- 正文:使用连笔飘逸的行书或草书。
- 印章:使用方正古朴的篆体。
- 技术点:如果只用一种字体,印章会显得非常突兀(像打印店刻的章),双字体是提升质感的关键。
-
拟真随机算法 (Jitter Algorithm):
- 位置抖动:每个字不再死板对齐,而是随机发生 \(\pm 4\) 像素的偏移。
- 大小呼吸:字号在 \(92\% \sim 108\%\) 之间随机缩放,模拟下笔轻重。
- 微旋转:引入 \(\pm 1.5^\circ\) 的随机倾斜,增加灵动感。
-
动态宣纸纹理: 利用噪声算法(Noise)和高斯模糊(Gaussian Blur)实时生成带有纤维感的米黄色宣纸底色,而不是简单加载一张背景图。
02. 准备工作
在运行代码前,你需要准备以下素材(放在脚本同级目录下):
brush.ttf:正文毛笔字体(推荐:禹卫书法行书、李旭科毛笔行书)。seal.ttf:印章篆体字体(推荐:方正小篆、汉仪粗篆)。
注:如果没有 seal.ttf,代码会自动降级使用正文字体,但效果会打折。
03. 完整实现代码
将以下代码保存为 calligraphy_gen.py。该版本已修复所有浮点数坐标报错问题,并优化了印章逻辑。
import os
import random
import math
from PIL import Image, ImageDraw, ImageFont, ImageFilter

class ArtisticCalligrapher:
    def __init__(self, main_font_path, seal_font_path, bg_color=(242, 238, 230)):
        """
        初始化书法生成器
        :param main_font_path: 正文字体路径 (如行书)
        :param seal_font_path: 印章字体路径 (如篆体)
        :param bg_color: 背景宣纸色 (默认米黄)
        """
        self.main_font_path = main_font_path
        self.seal_font_path = seal_font_path
        self.bg_color = bg_color

    def add_paper_texture(self, img):
        """核心算法1:生成宣纸纹理"""
        width, height = img.size
        draw = ImageDraw.Draw(img)

        # A. 添加随机噪点 (模拟纸张纤维)
        # 密度控制在 8%
        for _ in range(int(width * height * 0.08)):
            x = random.randint(0, width - 1)
            y = random.randint(0, height - 1)
            # 噪点颜色基于背景色微调
            color_offset = random.randint(-20, 20)
            noise_color = (
                max(0, min(255, self.bg_color[0] + color_offset)),
                max(0, min(255, self.bg_color[1] + color_offset)),
                max(0, min(255, self.bg_color[2] + color_offset))
            )
            draw.point((x, y), fill=noise_color)

        # B. 模拟纸张晕影 (模拟陈旧感)
        overlay = Image.new('RGBA', img.size, (0,0,0,0))
        overlay_draw = ImageDraw.Draw(overlay)
        for _ in range(6):
            x = random.randint(0, width)
            y = random.randint(0, height)
            r = random.randint(150, 450)
            # 淡淡的褐色斑块
            overlay_draw.ellipse((x-r, y-r, x+r, y+r), fill=(210, 205, 190, 25))

        # 高斯模糊融合
        overlay = overlay.filter(ImageFilter.GaussianBlur(60))
        img = Image.alpha_composite(img.convert('RGBA'), overlay).convert('RGB')
        return img

    def create_seal(self, content, size=100):
        """核心算法2:生成仿古印章 (支持篆体)"""
        # 放大画布以处理旋转边缘
        canvas_size = int(size * 1.1)
        img = Image.new('RGBA', (canvas_size, canvas_size), (0, 0, 0, 0))
        draw = ImageDraw.Draw(img)

        # 印章颜色:朱红
        seal_color = (175, 35, 35)

        # 1. 画残缺边框 (模拟印泥痕迹)
        rect = [5, 5, size-5, size-5]
        for i in range(3):
            off_x = random.randint(-1, 1)
            off_y = random.randint(-1, 1)
            draw.rectangle([rect[0]+off_x, rect[1]+off_y, rect[2]-off_x, rect[3]-off_y],
                           outline=seal_color, width=random.randint(2, 4))

        # 2. 加载印章字体
        seal_font_size = int(size * 0.45)
        try:
            seal_font = ImageFont.truetype(self.seal_font_path, seal_font_size)
        except IOError:
            print(f"【警告】印章字体加载失败,降级使用正文字体。")
            seal_font = ImageFont.truetype(self.main_font_path, seal_font_size)

        # 3. 智能布局 (2字竖排,4字方阵)
        if len(content) == 2:
            char_h = seal_font_size * 0.9
            total_h = char_h * 2
            start_y = (size - total_h) / 2
            # 上字
            w1 = draw.textbbox((0,0), content[0], font=seal_font)[2]
            draw.text(((size-w1)/2, start_y), content[0], font=seal_font, fill=seal_color)
            # 下字
            w2 = draw.textbbox((0,0), content[1], font=seal_font)[2]
            draw.text(((size-w2)/2, start_y + char_h), content[1], font=seal_font, fill=seal_color)
        else:
            # 默认居中
            text_bbox = draw.textbbox((0,0), content, font=seal_font)
            w = text_bbox[2] - text_bbox[0]
            h = text_bbox[3] - text_bbox[1]
            draw.text(((size-w)/2, (size-h)/2 - size*0.02), content, font=seal_font, fill=seal_color)

        # 4. 做旧噪点 (模拟印泥不均匀)
        pixels = img.load()
        for _ in range(int(size*size*0.15)):
            x = random.randint(0, canvas_size-1)
            y = random.randint(0, canvas_size-1)
            if pixels[x, y][3] > 0: # 如果不是透明
                if random.random() > 0.65:
                    pixels[x, y] = (255, 255, 255, 0) # 擦除像素

        return img

    def generate(self, text, seal_content, base_font_size=80, output_file="result.jpg"):
        """主生成逻辑"""
        # --- 布局参数 (全部转为int防止报错) ---
        char_spacing = int(base_font_size * 1.15)
        line_spacing = int(base_font_size * 1.5)
        margin = int(base_font_size * 2.5)
        canvas_height = 1300 # 可根据字数动态调整

        # 计算宽度
        chars_per_col = (canvas_height - margin * 2) // char_spacing
        num_cols = math.ceil((len(text) + 1) / chars_per_col)
        canvas_width = margin * 2 + num_cols * line_spacing

        # --- 创建画布 ---
        print("正在编织宣纸纹理...")
        img = Image.new('RGB', (int(canvas_width), canvas_height), self.bg_color)
        img = self.add_paper_texture(img)

        # --- 绘制正文 (双重随机算法) ---
        print("正在挥毫泼墨...")
        # 坐标起点:右上角
        cursor_x = canvas_width - margin - base_font_size
        cursor_y = margin

        for char in text:
            # 1. 随机字号 (模拟墨量变化)
            scale = random.uniform(0.92, 1.08)
            current_font_size = int(base_font_size * scale)
            font = ImageFont.truetype(self.main_font_path, current_font_size)

            # 2. 随机偏移 (模拟手腕摆动)
            offset_x = random.randint(-4, 4)
            offset_y = random.randint(-4, 4)

            # 3. 墨色微调 (避免死黑)
            ink_val = random.randint(15, 35)
            ink_color = (ink_val, ink_val, ink_val)

            # 4. 绘制单字图层
            char_layer = Image.new('RGBA', (int(base_font_size*1.5), int(base_font_size*1.5)), (0,0,0,0))
            char_draw = ImageDraw.Draw(char_layer)
            # 居中绘制
            char_draw.text((base_font_size*0.25, base_font_size*0.25), char, font=font, fill=ink_color+(240,))

            # 5. 微旋转 (关键!)
            angle = random.uniform(-1.5, 1.5)
            char_layer = char_layer.rotate(angle, resample=Image.BICUBIC, expand=0)

            # 6. 粘贴回主画布 (坐标强转int)
            paste_x = int(cursor_x + offset_x + (base_font_size - char_layer.width)/2)
            paste_y = int(cursor_y + offset_y + (base_font_size - char_layer.height)/2)
            img.paste(char_layer, (paste_x, paste_y), char_layer)

            # 移动坐标
            cursor_y += char_spacing

            # 换列检测
            if cursor_y > canvas_height - margin - base_font_size*1.2:
                cursor_y = margin
                cursor_x -= line_spacing

        # --- 盖章逻辑 ---
        seal_size = int(base_font_size * 1.1)

        # 判断当前列是否还有空间
        if cursor_y + seal_size + margin > canvas_height:
             cursor_y = margin
             cursor_x -= line_spacing
        else:
             cursor_y += int(base_font_size * 0.6)

        # 生成印章
        seal_img = self.create_seal(seal_content, size=seal_size)

        # 印章随机旋转
        seal_angle = random.uniform(-3, 3)
        seal_img = seal_img.rotate(seal_angle, resample=Image.BICUBIC, expand=1)

        # 计算盖章位置
        seal_offset_x = random.randint(-2, 2)
        seal_x = int(cursor_x + (base_font_size-seal_size)/2) + seal_offset_x
        seal_y = int(cursor_y)

        img.paste(seal_img, (seal_x, seal_y), seal_img)

        # --- 最终质感处理 ---
        img = img.filter(ImageFilter.SMOOTH_MORE) # 整体柔化,融合笔触
        img.save(output_file, quality=98)
        print(f"✅ 书法作品已生成: {output_file}")

# --- 运行配置 ---
if __name__ == "__main__":
    # 1. 字体配置 (请修改为你电脑上的实际路径)
    main_font = "brush.ttf"  # 行书/草书
    seal_font = "seal.ttf"   # 篆体

    # 2. 安全检查
    if not (os.path.exists(main_font) and os.path.exists(seal_font)):
        print(f"❌ 错误:请确保目录下包含 {main_font} 和 {seal_font}")
    else:
        # 3. 内容配置
        artist = ArtisticCalligrapher(main_font, seal_font)

        # 苏轼《定风波》
        content = "莫听穿林打叶声何妨吟啸且徐行竹杖芒鞋轻胜马谁怕一蓑烟雨任平生"

        # 注意:篆体字库通常只包含繁体字,请务必使用繁体输入!
        seal_text = "蘇軾"

        # 4. 生成
        artist.generate(content, seal_text, base_font_size=110, output_file="su_shi_calligraphy.jpg")
最终运行效果如图,当然可以根据自己对字体的爱好,进行修。
CONTINUE EXPLORING
DISCUSSION
留言与讨论
分享你的理解,或留下一个值得继续讨论的问题。
还没有留言,欢迎成为第一个参与讨论的人。